


The Full Anatomy of an AR-15
Posted by charlie@at3tactical.com BigCommerce on Mar 31st 2026
The Full Anatomy of an AR-15 &
Proper Part Names
Just bought your first AR-15 and suddenly it feels like everyone is speaking a different language? People start throwing around terms like bolt carrier group, castle nut, gas system, and handguard like you are supposed to know exactly what they mean.
If that sounds familiar, you are in the right place. One of the hardest parts of getting into any hobby is learning the terminology. You do not know what you do not know, and with AR-15s there are a lot of parts, a lot of names, and a lot of opinions.
In this guide, we are going tip to tail through the AR-15 so you can understand the major components, where they are located, and what they actually do. By the end, you should feel a lot more confident when researching parts, shopping for upgrades, or just following along when other shooters start talking shop.
Quick Index
Upper vs. Lower Receiver
Let’s start with the basic structure of the rifle. Every AR-15 is built around two main assemblies: the upper receiver and the lower receiver. These two halves are what make the platform so modular and easy to maintain, customize, and upgrade.
They are held together by two pins. The rear pin is called the takedown pin. When you push it out, the rifle pivots open so you can access the internals without fully separating the rifle.
The front pin is the pivot pin. Once you remove that as well, the upper and lower separate completely into two halves.
Technically, what most people are handling are complete upper and complete lower assemblies, but in everyday conversation they are commonly just called the upper and the lower.
Lower Receiver Overview
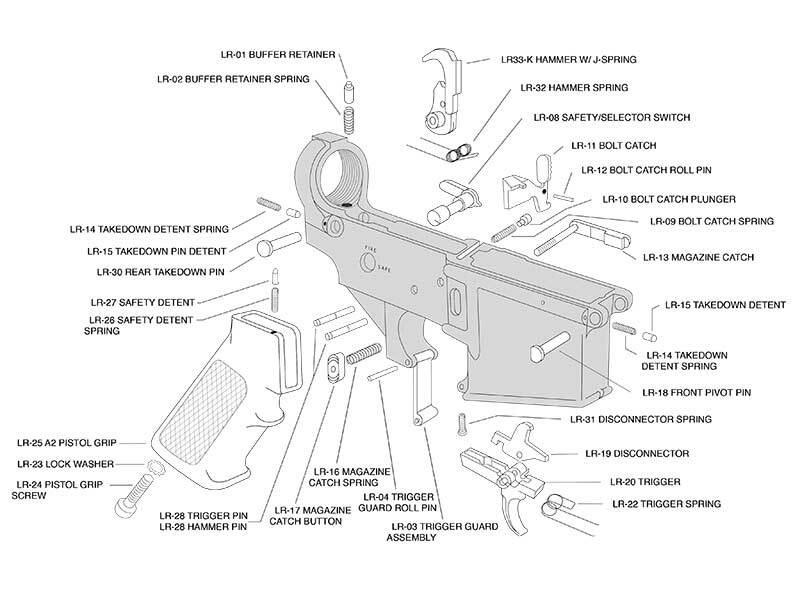
The lower receiver assembly contains most of the controls you interact with while running the rifle. This is where you will find the stock, grip, safety, trigger, magazine controls, and part of the recoil system.
Stock and Buffer System
Starting at the rear, we have the stock, also called the buttstock. Many AR-15s use an adjustable stock, which lets you change the length of pull to better fit your body size, clothing, or shooting position.
The stock slides onto the buffer tube, which threads directly into the lower receiver. The buffer tube serves two main jobs: it provides the mounting point for the stock, and it houses the buffer and buffer spring.
At the base of the buffer tube is the castle nut. Its job is to lock the buffer tube in place so it does not rotate or loosen. Between the castle nut and the receiver is the end plate, which helps align the assembly and also captures the takedown pin detent and spring.
That detent and spring are what keep the takedown pin from sliding all the way out while also giving it that positive feel when opening or closing the rifle.
Buffer and Spring
Inside the buffer tube are two critical parts: the buffer and the buffer spring. When the rifle fires, the bolt carrier group moves rearward and pushes the buffer into the tube. The spring then pushes everything forward again, allowing the rifle to cycle.
Buffers come in different weights, often labeled H1, H2, H3, and so on. In general, a heavier buffer helps slow the rearward movement of the action and can also help drive the bolt back into battery with more authority.
You will also find a small part called the buffer retaining pin and spring. This keeps the buffer from launching out of the tube when you separate the upper from the lower. It is a tiny part, but anyone who has disassembled an AR knows it likes to fly if you are not paying attention.
Safety and Grip
The safety selector is the lever that switches the rifle between safe and fire. Traditional safeties use a 90-degree throw, but 45-degree and 60-degree selectors have become more common because they require less movement.
The safety is held in place by a detent and spring, and those parts are captured by the pistol grip. That is also a good time to clear up a common point of confusion: on an AR-15, this rear grip is called the pistol grip to distinguish it from any forward grip that may be mounted on the handguard.
Pistol grips come in different shapes, textures, and angles. Some are designed for comfort, some for better control, and some for specific shooting styles.
Trigger Group
Moving forward, we get to the trigger assembly. In a standard AR-15, this includes three main components: the trigger, the hammer, and the disconnector. Each of these has a corresponding spring, and everything is held in place by the trigger pin and hammer pin.
You will often hear the term mil-spec trigger. That refers to the standard military-style design. It is functional and proven, but many shooters eventually upgrade to a drop-in trigger, sometimes called a cassette trigger, for a lighter and cleaner trigger pull.
Drop-in triggers are usually easier to install and often provide a more refined shooting experience, but they also come at a higher cost.
Magazine, Bolt Catch, and Magazine Release
The magazine is what holds the ammunition and feeds it into the rifle. This is also where it is worth clearing up another common mistake: a magazine is not a clip. A clip is a different type of loading device, and while the terms get mixed up all the time, modern AR-15s use magazines.
The magazine locks into the rifle through the magazine catch and is released by pressing the magazine release button. When pressed, the catch moves out of the way and allows the magazine to drop free.
Then there is the bolt catch. After the last round is fired, the magazine follower pushes up on the bolt catch. As the rifle cycles, the catch rises and stops the bolt carrier group from moving forward again, locking the action open.
Upper Receiver
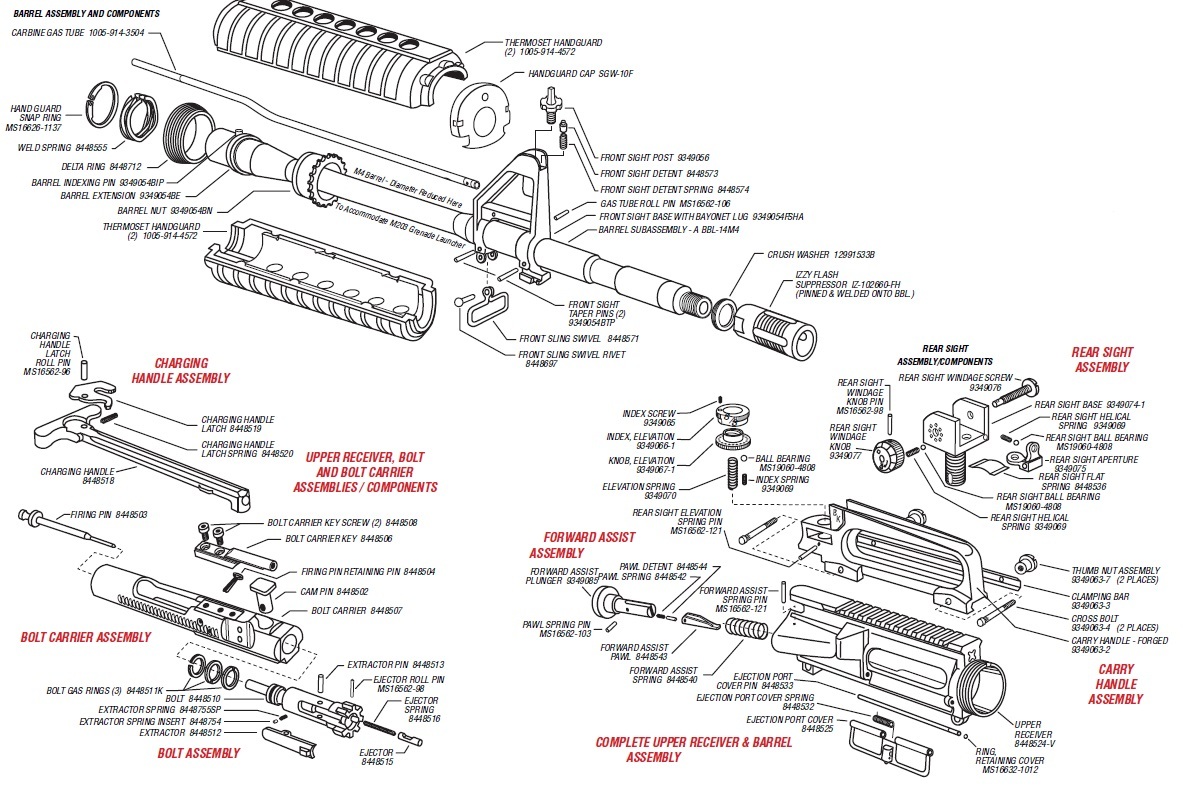
Now let’s move to the upper receiver assembly. This is where you will find the charging handle, bolt carrier group, barrel, gas system, handguard, and muzzle device.
Charging Handle
At the very rear of the upper receiver is the charging handle. This is one of the most commonly upgraded parts on an AR-15. You can find everything from simple mil-spec handles to oversized ambidextrous designs with large wings for easier manipulation.
Its job is straightforward: it hooks onto the bolt carrier group so you can pull it to the rear to chamber a round, clear the rifle, or inspect the chamber.
On the right side of many upper receivers you will also find the forward assist. The original AR-15 design did not include one, but it became a common feature over time. Pressing it helps push the bolt fully forward if it does not seat on its own.
The forward assist is one of those parts that shooters love to debate, but whether you use it often or not, it is a recognizable part of many AR-pattern uppers.
Bolt Carrier Group
The bolt carrier group, or BCG, is the heart of the rifle. It is called a group because it contains multiple parts working together.
At the front is the bolt, which has locking lugs that engage with the barrel extension when a round is chambered. This is what contains the pressure when the rifle is fired.
The bolt also includes the extractor, which grabs the spent case, and the ejector, which helps kick that case out of the rifle.
The BCG also houses the firing pin, cam pin, retaining pin, and gas rings. These parts all work together to fire, unlock, extract, eject, and reset the system for the next round.
Unless you are doing something highly specialized, you usually do not need to source all of these small components individually. Most bolt carrier groups come complete, and many of the smaller wear items inside are considered consumable parts over the long term.
Barrel and Gas System
The barrel does more than simply guide the bullet. On an AR-15, it also plays a major role in cycling the firearm.
A small hole in the barrel called the gas port directs gas into the gas block. From there, gas travels through the gas tube and into the gas key on the bolt carrier group. That gas pressure is what helps unlock and cycle the action.
This operating method is commonly referred to as direct impingement. In simple terms, the rifle is using gas pressure from the fired round to run the action.
Gas blocks come in different sizes, and the size you need depends on the barrel’s gas block journal diameter. Some are also adjustable gas blocks, which let you tune how much gas is sent back to the action. These are especially popular on suppressed rifles or more specialized builds.
The barrel assembly also includes the barrel extension, which is typically pre-installed from the factory. Inside the rear of the barrel is the chamber, where the cartridge sits before firing. Running through the inside of the barrel is the bore, and the spiral grooves inside it are called the rifling, which spin the bullet as it travels downrange.
At the front end of the barrel is the muzzle, which is often threaded to accept muzzle devices.
Muzzle Devices
One of the most common muzzle devices you will see on an AR-15 is the A2 birdcage flash hider. Another common style is the 3-prong flash hider. These are designed primarily to reduce visible muzzle flash.
If the goal is recoil management instead, you are looking at devices like compensators or muzzle brakes. These use ports to redirect gas in ways that help reduce muzzle rise and felt recoil.
There are countless muzzle devices on the market, including models that serve as mounts for suppressors. Some use quick-detach systems that allow you to attach or remove a suppressor without removing the muzzle device itself.
Handguards
The handguard is the part you hold with your support hand, but it also serves as the mounting surface for many accessories.
Older AR-15s commonly used two-piece drop-in handguards that physically contacted parts of the barrel assembly. Over time, shooters moved toward free-float handguards, which do not touch the barrel directly. This can improve consistency and help preserve accuracy.
Free-float handguards mount to the barrel nut, which is the part that actually secures the barrel to the upper receiver. Handguards either clamp onto or bolt to that interface depending on the design.
One important detail is that barrel nuts are not especially standardized. Different handguards often use different barrel nuts, so compatibility matters when mixing parts.
As for mounting accessories, the two most common attachment systems are Picatinny rail and M-LOK. Quad rail handguards have full Picatinny rail sections around the handguard and are extremely solid, but they can feel bulky and sharp in the hand. M-LOK offers a slimmer, lighter mounting solution and has become increasingly common on modern AR-15s.
It is also easy to bridge the two systems by using M-LOK rail adapters when needed.
QD or Quick Disconnect
Before wrapping up, there is one more term worth knowing: QD, which stands for Quick Disconnect.
QD systems are commonly used for slings, but the term also shows up with optics mounts and suppressor mounting systems. On stocks, end plates, and some handguards, a QD sling socket usually looks like a small round recessed hole designed to accept a push-button sling swivel.
It is a small feature, but it is one of those terms you will hear often once you start looking at accessories and rifle setups.
Final Thoughts
There are still a few AR-15 parts and terms we did not cover here, but this guide hits the major components found on most modern rifles. The goal is not to turn you into an armorer overnight. It is to help you understand the language, recognize the major parts, and feel more confident when learning about the platform.
The AR-15 can seem complicated at first, but once you break it down piece by piece, it becomes much easier to understand. Learn the upper. Learn the lower. Learn what each system does. After that, everything else starts making a lot more sense.